Peapod, the kayak

This likely qualifies as my most unusual ask: “Grandma, can you knit a kayak?” My granddaughter explained that her beloved small stuffed wolverine (both her parents are University of Michigan grads) needed a kayak. I didn’t ask why. If your wolverine needs a kayak, it just needs one.

I set to pondering how to knit a kayak. First step, search on Ravelry to see if anyone has released a pattern for a knitted kayak. No. Knitted canoe. No. Knitted boat. Yes, but none that looked promising. Next I looked for patterns of properly shaped fruits or veggies. In Ravelry’s “advanced search” feature you can filter for “food” within the “toys & hobbies” category. 864 knitted items showed up in the search, including some that got close to the shape I needed. Chili peppers and carrots. Not quite. But maybe I could knit the narrow section at both ends instead of just one. Roasted Turkey Leg might work if I didn’t plump up the leg so much.  Bananas. Getting closer.

And then I found Amanda Berry’s  Pea Pod. It’s part of her free series of Vegetable Box patterns.  24 veggies designed for DK weight. Super cute and super generous of her to release the patterns without any charge. Pea Pod pattern in hand, I could set to knitting. No need for the peas.

I used Brown Sheep’s Lamb’s Pride worsted for the kayak.

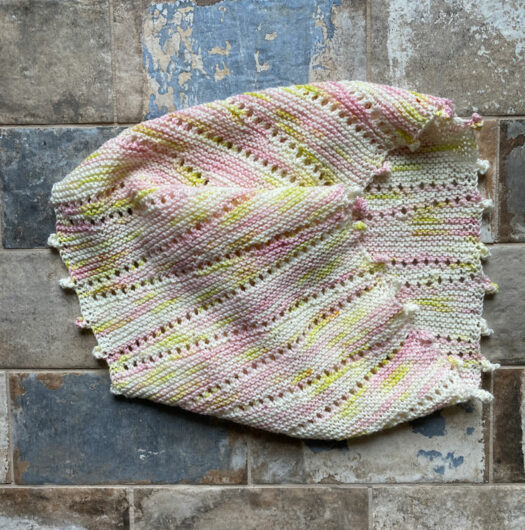
I knit 2 peapods in this beefy worsted yarn–one on needle size 7 US and one on size 6. I figured I’d stiffen the kayak by inserting the smaller one into the larger. I followed Barry’s pattern through Row 12, which took the stitch count to 15. I continued the same centered increases until I reached 33 stitches. For the middle section where there are no increases, I knit 36 rows instead of 18. After that, I knit two centered decreases on each right side row until I got down to 5 stitches and then I bound off. I didn’t work the rows of stockinette at the very end because kayaks in my world are not as pointy as peapods.

I wet-blocked both pieces.

Sewing up was easy. I sewed the larger piece together into a kayak shape by knitting part way down from each end. I left a center cockpit large enough so that the wolverine has room for his feet without getting his long claws stuck. Then I sewed the smaller piece together the same way–slipping the smaller one into the larger one to give the kayak more firmness. It wasn’t firm enough so I added in a bit of polyfill between the layers. Then I just stitched the two kayak shells together.

We are all super diligent about wearing personal flotation devices in our kayaks. I couldn’t let Wolverine set a bad example.

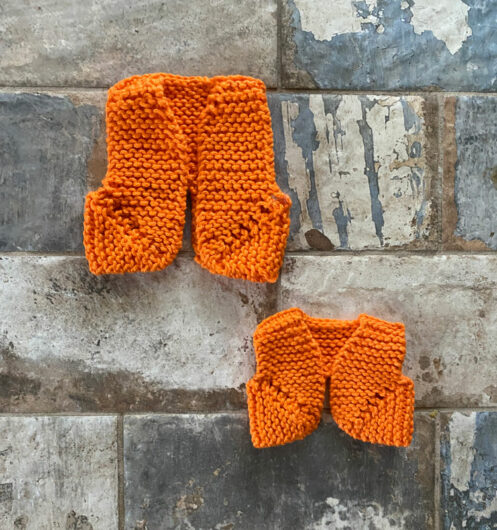
I adapted Meg Swansen’s Baby Bear Ribwarmer pattern for use as a PFD/life jacket. I used Queensland Collection’s Coastal Cotton, a worsted weight. I knit the top ribwarmer on US size 5 needles and followed Swanson’s pattern exactly. I figured it would be too large for Wolverine (and for my Lambie). But I wasn’t sure how to adapt it. In my smaller version, I knit very tightly on size 2.5 US needles. And I knit fewer garter ridges on the back and sides.

A perfect fit!

Obviously Wolverine can’t kayak without a paddle. I knit a length of I-cord and then stuffed a plastic straw inside.

At first I tried to tie white guitar picks to the ends of the shaft for the paddle blades. All that did was ruin two perfectly good guitar picks. I ended up knitting two leaf shapes, on double point needles, and sewed them to each end of the shaft. And that’s just a short crochet chain for the carry straps.

My grandkids live many states away from me. Covid prevented us from visiting in Michigan for way too long. Peapod the Kayak was ready and waiting on my granddaughter’s camp bed when she arrived.

This grandmother gig is so much fun!

Cowling

This is a major knitting stutter for me. I’ve knit it in multiples, this one being my third. It’s Joji Locatelli’s Bobble Cowl. She is of the view that it’s “a perfect way to use up a single skein of yarn.” I agree that it’s pretty close to perfect. I knit this one in Kokon Yarn Bleu Fingering Weight. It’s put up in 437 yard 100 gram skeins. I worked 12 repeats of the 48 row pattern and used up about 360 yards. I’m confident I could have knitted one more repeat. But I felt the length was good at 12.

Obviously, the pattern is mostly a matter of short rows. That’s an easy skill to master. Still, especially at the start of the pattern, I usually need a bit of help recognizing the correct spot to turn. When working the wraps & turns in the first half of the pattern repeat, when the pattern says work to “6 stitches before,” I worked until the 7th stitch from the wrapped stitch gap. I slipped that 7th stitch to the right hand needle and moved the yarn forward. I turned and that created the wrapped stitch. This count means that the stitches will bunch in 6-stitch groups. That works out so that you end the wrap-and-turn sequences in the first half of the pattern repeat with 3 stitches left, the 3rd one being wrapped. That’s the same point where the sequence ends in the second half of the pattern repeat.

Here’s another look at my Kokon Bleu version.

I decided to knit up a gifted skein of Yarn Snob’s A Good Fingering in this same pattern. This is their Holiday Flower Power colorway. Again, for my 4th Bobble Cowl, I worked 12 repeats.

If you’ve wondered, Locatelli’s pattern sensibly doesn’t call for knitting into the wraps as you pass them in any subsequent rows. In garter stitch the wraps don’t detract from the pattern.

The pattern begins with a provisional cast-on so that you’ll have live stitches at the ready to join with your last row of stitches. I use Lucy Neatby’s easy crochet cast-on. It unravels perfectly and easily because all the stitches in the first row are knit stitches. Instead of working Kitchener grafting, I work a 3-needle bind-off. That’s because I sometimes have trouble keeping an even tension while grafting garter stitch. I don’t mind the resultant seam on the inside of the cowl. But working Kitchener at the end will make for a more elegant look. And if you’re knitting for a non-knitter, there’s a more than 50% chance they’ll be wearing the cowl inside out. So if you can manage the graft at least you won’t have the added aggravation of seeing the 3-needle bind-off seam dangling under their chin.

The stitch count stays at 60 throughout the pattern. If you find that you have 2 extra stitches, it might be that you forgot to bind off two stitches at the end of the bobble. Ahem. I’m guessing that you know how I know that.

The Bobble Cowl is big favorite of mine.

Next up is Loop Knallerbse, by Petra Peinze. Stop laughing. It’s not a cowl for a baby giraffe.

Isn’t it cool in a very warm kind of way? I knit mine in Queensland Collection Perth using the Golden Wattle colorway. For some, this sock yarn won’t feel properly next-to-the-neck soft. But I’m not sensitive to that. So it’s a little prickly. So am I sometimes. It suits me well.

This Ravelry freebie is definitely worth your time. It’s so long that you can even pull it up over your head as a snood. Because snoods don’t only have to be mesh bags holding hair at the back of a person’s head. Loop Knallerbse qualifies as a “wide ring of knitted material worn as a hood or a scarf.” New Oxford American Dictionary. I just love that word. Snood. Snood. Snood.

Go blue

NIcely organic, don’t you think? This is Grace Wong’s Mosaic Leaf Hat, a Ravelry freebie. Well, this is the crown section of Mosaic Leaf Hat. And if you think this is really a Pittsburgh Steelers’ black and gold team hat, it isn’t. Try as I might I couldn’t get this hat’s true maize and blue to photograph it’s blue properly. Possibly it was some secret Spartan green and white plot?

Enough of the University of Michigan vs. Michigan State University rivalry. I didn’t attend either school. But Michiganders seem to choose sides anyway. For the record, I attended Wayne State University in Detroit. I matriculated in an era when Wayne State’s teams were called the Tartars. Just like the stuff you go to the dentist to scrape off your teeth. Even spelled the same way. I suspect that the image the Wayne State team-naming founders intended to conjure was the fierce fighting Tartars of Tartary.

This is a fine hat. It’s an interesting slip stitch pattern with slipped stitches separated by somewhat long floats in some of the sections. Here’s Mosaic Leaf on the inside.

A knitter needs to be sure not to tighten up those floats or the hat will pucker like a dried prune.

You’ve been waiting long enough to actually see this hat.

I knit mine in Plymouth Yarn’s workhorse Encore Worsted, a 75% acrylic 25% wool. The colorways were 842 Navy and 3482 Yellow. That’s Navy, not black.

Unexpected to me, at the bottom of each of the second and third layer of leaves, where there’s an increase in stitches, the increase tugs in a way that bares the contrast color at bit. Although I’d rather not see the contrast color peaking through, I’ve decided it’s the nature of the beast. I made my peace with it. Next time I might try a knit in the front and the back then the front again at the increase. Possibly that would work better than the suggested increase. And if my yarn had a significant halo that might hide the peek-a-boo bit. But that could also make the leaf pattern less distinct.

This is a big 112-stitch hat that’s sensitive to row gauge. That’s because you can’t just stop the body of the hat when it’s tall enough and start the crown. I had a row gauge problem with my Plymouth Encore. I tightened the stitch gauge by dropping down a needle size on each section, to a US 7 and US 9, and that worked for me.

Next up is another hat knit in the same Plymouth Encore colorways.

This one is School Colors Hat AC-53, a classic Fiber Trends pattern by Betsy Lee McCarthy. It’s still available in shops and is downloadable on Ravelry.

I’ve knit many versions of this hat and post them regularly on my blog. A number of folks have contacted me because they can’t figure out how to get that double roll to roll properly. The pattern directions say: “Fold the lower edge of hat up as shown in photo.” At the start the pattern says that “the lower edge of hat must be rolled up to get the double roll look shown in the photo.” I didn’t have a problem with the double roll, but I’ve sometimes wondered if the questioners missed that you start knitting with the main color. So, for this version, I cast on in the navy. You start with the main color even though your eyeballs make it look like you’d start with the yellow contrast color. When the hat is complete you basically fold the hat up to the last color change–(in mine) where the yellow ends and the navy begins again–and just fiddle with the fabric until you form the double roll.

Such a no-nonsense pattern. But with that interesting improbable double-roll start it’s fun to knit. Plus it has a nicely behaved crown decrease. This pattern was copyrighted in 2002 and by now knitters have knit a zillion versions.

More blue. This one’s Clara Parkes’ Hill Country Hat. It’s included in her book, The Knitter’s Book of Wool. But she’s also released it as a freebie on Ravelry. This is the 11th time I’ve knit it and you can search in the search window above if you want to see all my versions. This one is knit in King Cole Big Value Chunky. It’s a bulky 100% acrylic. The colorway is Blue Heaven.

Hill Country knits up super fast. If you knit it in acrylic none in the “it itches” crowd will be complaining. But I do like it best in a chunky wool.

Hill Country ends with an excellent pinwheel crown decrease.

With the exception of Wong’s Mosaic Leaf Hat, this post is filled with very straightforward knits. Galina Shemchuk’s aptly named Just a Hat is another. I knit mine in Plymouth Yarns Worsted Merino Superwash. The colorway is No. 86 Denim Heather. Nice wide brim. Easy “mistake rib” stitch pattern.

Well thought-out crown decreases.

The pattern is translated from Russian, but its English version is clear and error free. As the pattern directs, be sure to finish the Mistake (False English) Rib section after a round 2. That will make the crown decreases work out. Also, a few of the crown decrease rounds don’t complete a full set of stitches set out between the asterisks in the pattern. Just stop working the “asterisked” section e.g. 2 stitches before the round marker (as the pattern directs) and follow the directions for the last stitches before the round marker. It all works out correctly.

The pattern ends with 24 stitches to gather in. My sense is that’s too many. So I knit two together all around as Round 6. That left a more manageable 12 stitches to gather in. I knit one additional round to draw the stitches together a bit more.

Just a Hat is so worth your knitting time. Any head can wear it. And any knitter can knit it.