Cat stuff

This fingering weight stuffie is Sara Elizabeth Kellner’s freebie, Tiny Window Cat.  What a cutie! Many yarnie types will know how tall the Clover “catcha-catcha” counter is. Two and 3/4 inches. 7 centimeters. Tiny cat ends up about half an inch taller.

I felt like my cat was looking as if she needed her own cozy cat basket.

To knit the sides of Tiny’s basket, I cast on 32 stitches, in the round. I knit 9 rounds, purled 1 round, knit 9 rounds, and bound off. Then I folded the basket on the purl round and sewed the cast on and bound off edges together, wrong sides facing each other. Echoing the construction of the bottom of the cat, I picked up 32 stitches along the bottom edge. I worked rounds 1 through 5 of Kellner’s pattern for the bottom of the cat, except on rows 1, 3 and 5, I worked the decreases 8 times around to form the bottom of the basket.

Tiny cat ended up in my granddaughter’s knitted “lovies” stash. Even her older brother thinks this guy is cute.

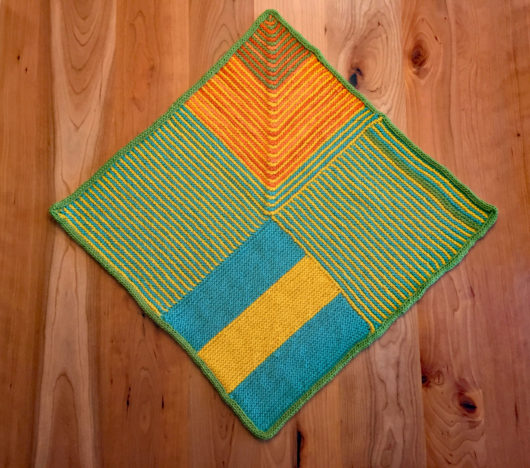
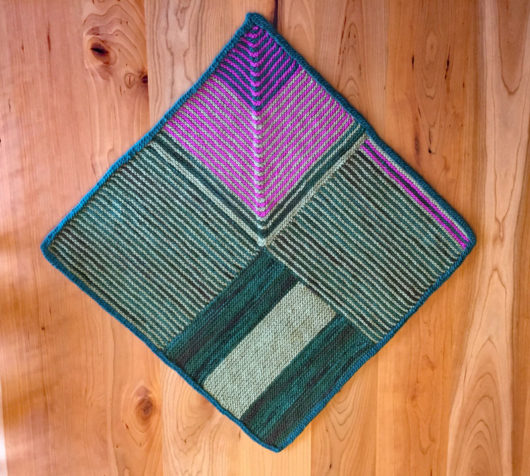
Keeping to today’s cat theme, I have two new cat basket blankets to show off. You’ve seen me working these before, here. I always knit them in Brown Sheep’s Lamb’s Pride Worsted.

I have a theory that that dab of mohair in the yarn turns out to be a real cat whisperer.

These two are my newest.

They’ve already been gifted to two good cats, in one good home, who needed a few more cozy landing spots.

This is an adaptation of a freebie pattern from Donna Druchunas. Hers is designed for super bulky yarn. My version uses worsted weight. Mine increases the stitches in each section, adds that mitered square with decreases on the diagonal that avoids any sewing after the last square is finished, and includes a knitted-on edge. You will find the details on how I knit these cat blankets here.

Cat bed cozies

You saw two of these five cat (or dog) bed blankets a few months back. I think they make an interesting color statement as a set, so I’m including my first two attempts along with the three newer ones. My bed blankets are inspired by Donna Druchunas’s Garter Stitch Cat Shelter Blanket pattern.

I’ve knit mine in 100% wool–totally impractical for shelters. And maybe some will decide that they’re also impractical for households. From what I hear, cats don’t agree. Now that I think more about it, cats probably just don’t care about practical. If it feels cozy and a bit scratchy, they want it. As for practicality, I recommend the cats’ humans just wash the blankets and put them in the dryer when they need to be cleaned. I knit them somewhat oversized. The blankets will felt and the cats will still like them.

I’ve knit mine in Brown Sheep Lamb’s Pride Worsted.

More on my modifications of the pattern in a quick bit. These color studies turned out to be great fun to knit.

Here this pair is awaiting their test run.

Halo approves.

Feisty does too.


Lucy votes “yes.”

In fact, she even managed to co-op her housemate Jasmine’s blanket for awhile.

Here are my modifications to the Druchunas pattern.

  • Instead of working the blanket at a superbulky weight of 2 stitches to the inch, I used a worsted weight at 4 stitches (and 8 rows) to the inch.
  • For Squares 1-3, I cast on (or picked up) 48 stitches and worked for 48 ridges (96 rows).
  • I worked a few random rows of color, not so much because I planned it as that I thought I would run out of yarn otherwise.
  • For the final square, I worked a miter. I picked up (and knit) 48 stitches on the left side of Square 3 and 48 on the top of Square 1 and marked the middle stitch. Stitches are always picked up looking at the right (the public) side. Work on circular needles on this square. Count the pick-up row as Row 1. Row 2, knit. Then on every right-side row: knit to within 2 stitches of the center marker, K2 together. Slip the marker. Reverse the next stitch on the needle and then K2 together through the back loops (including the flipped stitch and the next one). Knit the remainder of the row. Decrease this way at the center of every right-side row. Knit every wrong-side row without any decreases. When 2 stitches remain, knit them together. You end up with a square the same size as the other squares.
  • I worked an “applied I-cord” border.  Cast on 4 stitches on double points. Start working the I-cord at a corner. Slide the stitches and knit 3 stitches, slip the next stitch (purlwise), yarn over, pick up and knit 1 stitch from the edge. Pass the yarn-over over the picked-up stitch. Then pass the slipped stitch over the picked-up stitch. Repeat the bolded directions until you’ve knit the entire border. The yarn-over trick covers the color blip that would otherwise appear. I picked up one stitch for every garter ridge, picking up the strand between the garter bumps. It will probably look best if you work the I-cord looking at the wrong (nonpublic) side. I worked an extra pickup or two at each corner. Graft/sew the beginning of the I-cord to the end of it.