Library Blanket

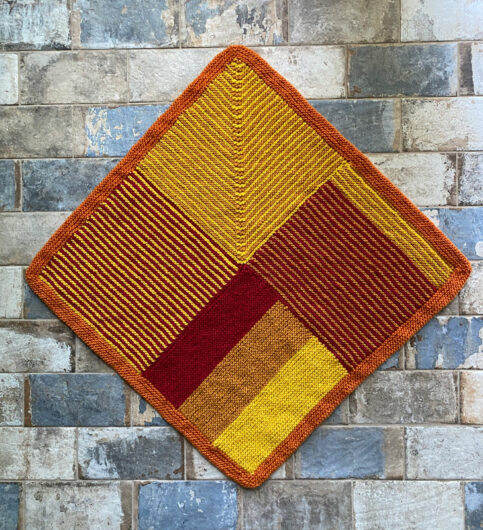
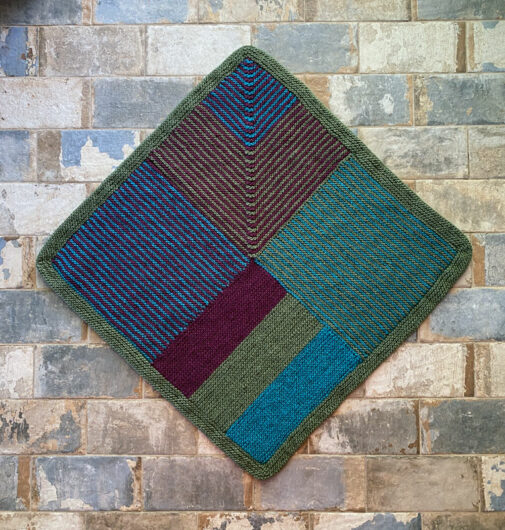
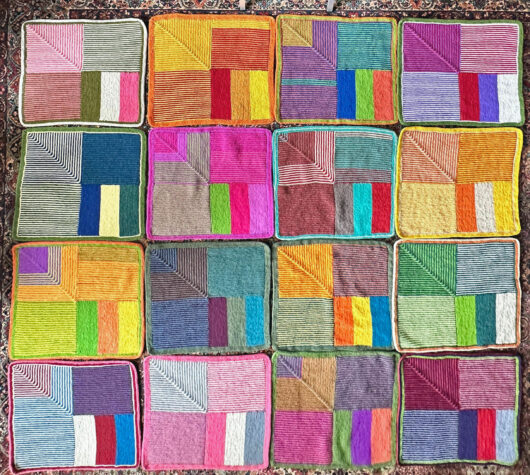
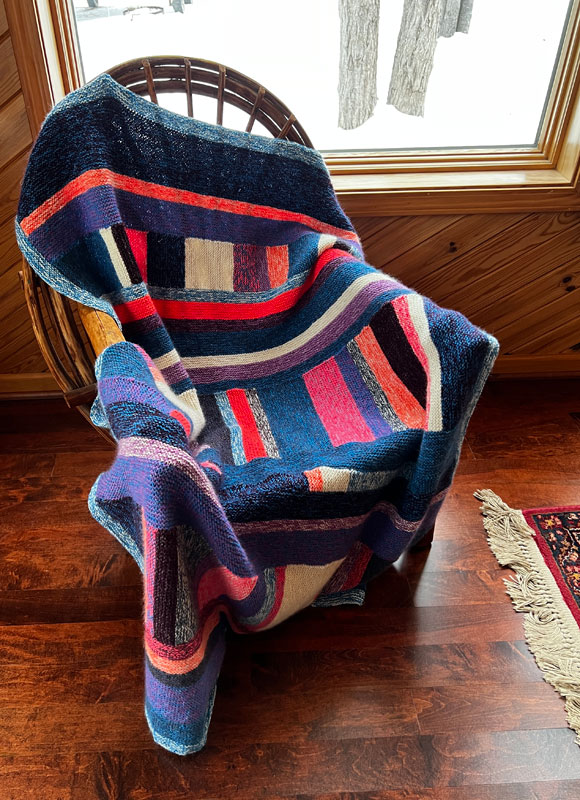
This is Purl Soho’s Library Blanket, designed by the shop’s owner and founder, Joelle Hoverson. This is what purlsoho’s profile says about itself on Ravelry: “Purl Soho is best known for bringing a modern sensibility to traditional fiber arts. Our own brand yarns and an extensive collection of (mostly free!) patterns have been inspiring crafters around the world since 2002.” And so they have.

For this project I decided I wanted to follow the pattern precisely, even the color choices. So I swallowed hard and bought the kit from the NYC Purl Soho shop (with its California warehouse). A few times each year all the Purl Soho shop-brand yarns are on sale (usually for 25% off) so I at least waited for a sale.

The kit for the larger size blanket includes 7 skeins of Purl Soho Lineweight. Lineweight is a fingering weight in 50% wool, 35% alpaca, and 15% linen/flax. Not an easy mix to reproduce in another yarn. For the larger blanket, the pattern suggests you buy one extra skein of the natural shade because–unless you knit to perfect gauge–you’ll be very close on the yardage. I decided to buy one extra skein. Somehow I ended up buying two. And, part of the story on this blanket, I ended up having yardage leftover even from the first skein of the natural Lineweight (“Heirloom White”).

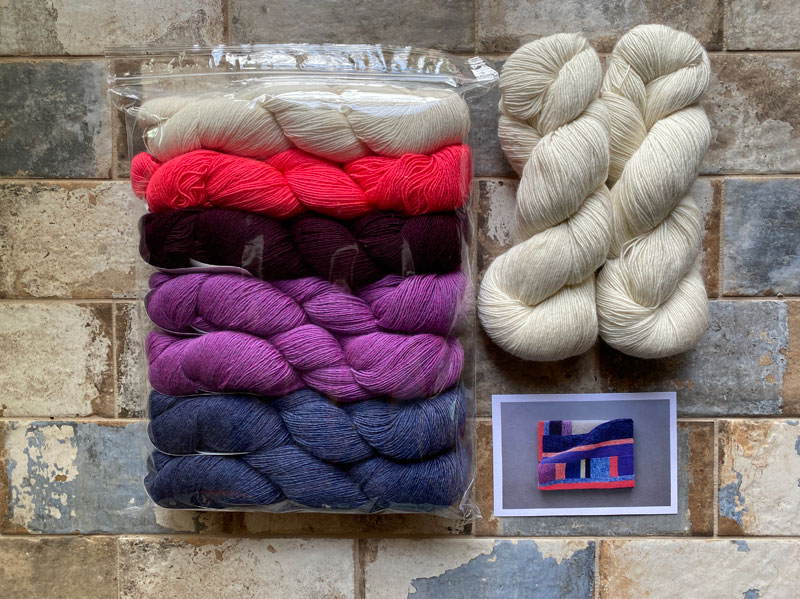
Library Blanket is knit double-stranded throughout with one strand of Lineweight and one strand of Purl Soho Linen Quill. Linen Quill is a light fingering weight 100% merino. Changing one yarn, or the other, or both, as the work progresses creates the interesting marled effect.

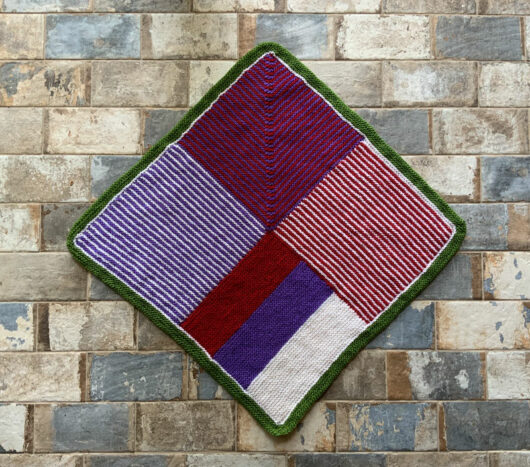
My blanket, minus its border used:

Line Weight (494 yards per 100 grams):

94 grams (475 yards) Heirloom White
60 grams (297 yards) Bright Flamingo
82 grams (405 yards) Red Plum
108 grams (534 yards) Lotus Flower
116 grams (573 yards) Blue Jeans
Total Line Weight used in the body of the blanket was 460 grams, 2284 yards.

In Linen Quill (439 yards per 100 grams) I used:

80 grams (352 yards) Pale Oats
52 grams (229 yards) Super Orange
46 grams (202 yards) Dark Iris
20 grams (88 yards) Crocus Bulb
284 grams (1247 yards) Cobalt Blue
Total Linen Quill used in the body of the blanket was 482 grams, 2118 yards.

If you’re knitting this blanket in yarn other than the Purl Soho, the yardage of each color could be helpful. Of course, your mileage may vary. I have a ridiculous amount of excess yarn from this project even not including the two extra skeins of Heirloom White Line Weight I purchased. It’s great yarn though and I am already thinking about what uses I’ll put it to.

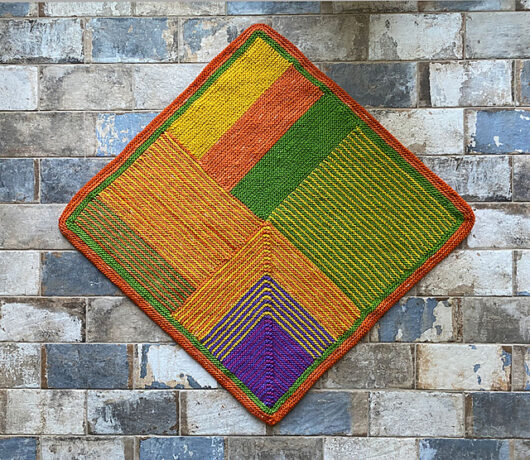
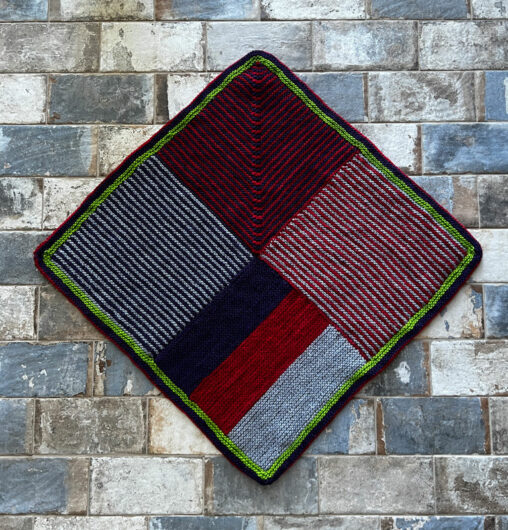
As a number of folks who’ve knit this blanket have observed, the blanket looks a tad raw without a border. Plus, there’s a noticeable difference in the cast-on (and off) for the vertical rows as compared to the edges of the horizontal rows. The perfectionists among us might want to knit a border.

I used a double strand of Linen Quill in Cobalt Blue and Heirloom White in Line Weight for my border. It used 90 more grams of yarn. I hooked all my Chiaogoo cords together. Then I picked up stitches all along the outer edge along with 1 stitch in the corner (which I framed with 2 stitch markers). Then I worked garter stitch in the round. On each right-side facing knit round, knitting in the front & the back of the stitch before and after the corner marked stitch created a nicely mitered corners.

This turns out to be a lightweight but very warm blanket. Actually, Library Blanket is more of a throw than a blanket, measuring about 40 inches wide and 56 inches long. That’s assuming you agree that the horizontal rows establish the width. To my eye, those rows represent the bookshelves and the vertical rows are the books of various thicknesses.

Here’s a few thoughts I jotted down to remember in case I knit this again:

(1) When working the slip stitch on the vertical stripes, it looked best to me if I slipped the stitches purlwise.

(2) Using a double-pointed needle in a shorter length or a shorter length circular helped make the vertical sections knit up more quickly.

(3) After working the PSSO on the vertical sections, tightening up the last stitch a bit before starting to work the wrong side row worked well and closed up the sloppy stitch that seemed to want to form.

(4) Even the thought of weaving all those ends in only after completing the knitting made me want to take a long winter’s nap. I worked the ends in as I knit along, using the same technique I use in Fair Isle knitting.

(5) When picking up stitches at the start of the horizontal garter stitch rows I didn’t follow the directions in the pattern. Instead, I picked up stitches between the “bumps,” not into them, because that’s always worked well in my Rambling Rows afghans.

(6) Before cutting the yarns at the end of each section, remember to look ahead to what yarns are used in the coming section. The pattern always says to cut both yarns. But sometimes one of the colors is continued into the next section so you only need to cut one yarn.

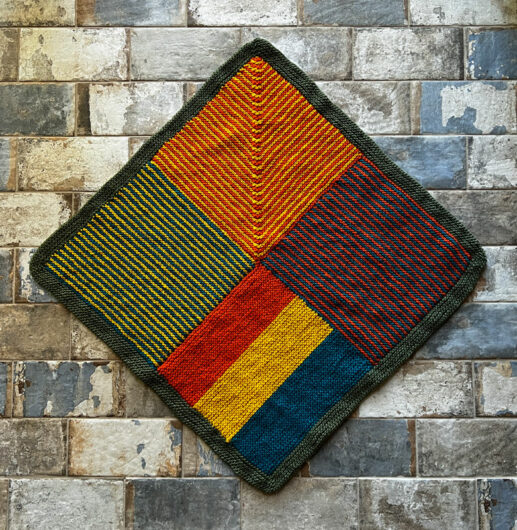
I can’t get enough of looking at this one. I love the colors. It doesn’t “go” with anything in my decor, but honestly I don’t care. I like the cut of its jib.

And how cool is this? The shop also sells a matching 1000-piece jigsaw puzzle!

The shop even includes a postcard you can send to a knit buddy announcing your blanket’s completion.

My Gartergantuan

I’m excited to show you this. Gartergantuan. On my queen-sized bed. The individual squares are 75% inspired by Donna Druchunas’s super bulky weight freebie pattern “Garter Stitch Pet Shelter Blanket.” Here’s a look at her design. I’ve decided that my modifications are enough to call Gargantuan my own design. Yarn weight is different. Stitch count is different.The size of an individual 4-section square is different. I changed the final quarter of each square and eliminated the need to sew the seam. I bordered the piece. And instead of being cat bed basket sized, mine is decidedly gargantuan.

First, some stats. Gargantuan is about 8 and one-half feet square. Yes 102 inches square. I used 63 skeins of Brown Sheep Lamb’s Pride Worsted. Lamb’s Pride is a non-machine washable 85% wool 15% mohair. 63 skeins works out to about 3.5 skeins of yarn for each one of the 16 big squares. Gargantuan used 11,970 yards of yarn.  7119 grams. I needed about 8 skeins of Lamb’s Pride to join the squares and knit the border. Possibly, I am a tad crazy. It sort of crept up on me. I did, however, find skeins on sale whenever possible since the current price of $14.60/skein is fairly steep and I obviously wasn’t picky about what colors I used.

I wanted a blanket that would be sort of a bedspread. I wanted it to hang to the floor on the sides.

And be long enough to tuck under and over the pillows.

I don’t have pets or children anymore. And I’m basically a tidy person. So–at least for now–being unable to wash this blanket isn’t a deal-killer for me. But I do think it would be for just about everyone else. Now, more about how this happened.

Initially, I found I really loved playing with colors. And I know from when I did have cats, that Hoover and J. Eddie loved to roll around on Lamb’s Pride Worsted. I knit 8 of the 4-section squares, bordered them, and gave them to a number of my relatives and friends who live with cats. The reviews were excellent.

I loved making these squares. But I kind of ran out of cats in my inner circle. And with how much yarn I needed for each I didn’t want to sell them (as some suggested). I figured people wouldn’t even pay what the yarn was costing me. Besides, I’ve never wanted to monetize my knitting passion. I’d rather give it away than sell it.

Some suggested I donate my extra squares to a pet shelter. But, quite sensibly, shelters don’t want wool bed or cage liners.

I just kept knitting them.

And knitting them.

Long after I ran out of cats.

Here’s how I knitted Gargantuan. Square by square. I cast on 48 stitches and worked flat on US size 8 needles. 24″ circulars worked best for me. To adjust the size of what you end up with just change the number of stitches you cast on. As you look at the diamond shape, the first quarter is the right side of the diamond–the one with alternating garter stitch ridges. That’s 2 rows of one color followed by 2 of the other. Just carry the yarn you aren’t using up the side. I knit 48 garter ridges (96 rows) and that gave me pretty close to a perfect square shape.  I counted my cast-on as a half-ridge. Then I bound off.


The next section is the wide stripes. This is where you add in a 3rd color. Pick up and knit 48 stitches on the left edge of the first square, looking at the square from the public side. Always pick up stitches looking at the public side. Knit 16 garter ridges (32 rows) of one color, followed by 16 garter ridges of another color, followed by 16 garter ridges of another color. Bind off.

The next section is the alternating stripes pattern again. Pick up 48 stitches on the left edge of the broader-striped section 2. Bind off.

In Druchunas’s shelter blanket, the final section is striped, but not mitered. So her patterning runs “straight” again. In my version, the last quarter of the alternating-colors square is mitered and the center decrease is raised. In the original, the final seam in the square needs to be sewn together. In my version there’s no sewing.

For this last quarter of the square, pick up (and knit) 48 stitches on the two remaining edges of the already-knit sections, plus one extra stitch in the center where the two sections meet. Set that center stitch off by putting a stitch marker on each side of it. Count the pick-up row as Row 1. Row 2, knit. Then every right-side row: knit to within 2 stitches of the center marker, knit 2 together, slip the marker, then knit the next 2 together using this technique: reverse the stitch after the marker and then knit 2 together through the back loops (including the flipped stitch and the next one). Knit the remainder of the row. Decrease this way either side of the marker on every right side row. Knit every wrong side row. When you have only 2 stitches remaining, knit them together.

Here’s how I worked the border on each of the individual squares. Sometimes I used one color. Other times I worked some stripes. Just change colors, if you’re going to, at the round change. You will now be working in the round, not flat.

Pick up and knit 96 stitches on each side, plus 1 stitch at each corner. Mark the corner stitch with a marker on each side. Put a visual cue, such as a different color stitch marker, to signal the round change. Purl the next round. On each right side round until you decide your border is wide enough, knit in the front and the back of each stitch on either side of the marked corner stitch. Alternate between the purl round and the increase-at-the-corner round to create mitered corners. Bind off when you’re satisfied with the width of the border. I worked 4 garter ridges and then bound off in knit on the right side.

In a few squares I ran out of yarn before I finished a section. Sometimes I just changed the colors on purpose. The squares look really nice even without rigidly adhering to a strict color plan.

I knit 16 squares. I could have decided on a different number. At some point there comes a time to stop and attach the squares to create a blanket. I could have “simply” slip-stitched the squares together. But for me slip-stitching is never “simply.” Mine tend to turn out messy. There’s also always the question of what yarn to stitch with. Definitely not Lamb’s Pride because a few swipes through the blanket and the yarn will snap.  Maybe you’ll decide to “just” use mattress stitch. But for me, it’s never “just.” Not on blanket squares anyway. Maybe I don’t mattress close enough to the edge of the knitting because I always get a major strip of over-firm lines in the blanket seams. They don’t feel very nice against skin. And they fall much more definitely than what I want for a blanket.

So I used a 3-needle bind-off technique to first attach 4 squares into a 4-square strip. And then to attach each of the 4 strips to one another. During this phase of the knit, it was back to knitting flat.

Before starting in on joining, I needed to decide what square would go where. I didn’t want 2 squares of similar colors next to one another. I wanted bright and dark squares arranged pleasingly. I cleared a space on the great room floor and laid out the squares in a bunch of ways. When I had what looked pretty good to my eye, I photographed the squares to see if the camera disagreed. This is pretty close to the final arrangement. (I later made a few changes on the fly.)

I chose a color of Lamb’s Pride for the garter stitch joins that hadn’t yet appeared in my blanket: gray. I picked up 105 stitches on the bottom edge of a square. I came up with that number because I had 96 stitches in an edge plus the number of stitches in my garter border. I knit 4 garter ridges, ending after a right side row. I left the stitches “live” on my needle. With another needle, I did the same on the top of the square to be joined. I was careful to align the squares so that the mitered section appeared in the same position throughout. With the right sides of each square facing each other, I worked a 3-needle bind-off. With a 3rd needle, knit through the first stitch on the front needle and the first stitch on the back needle. Knit through the next stitch on both needles. Then pass the first stitch over the just-knit stitch. Do this until all the stitches are bound off.

To attach one strip to the next I picked up 103 stitches along the edge of each square and 8 stitches in each gray (joining) section across the length of each of the 4 joined-together squares in the strip. Then I knit 4 garter ridges (7 rows). I did the same on the strip I wanted the 1st strip to be adjacent to. Then, with wrong sides facing in, I worked a 3-needle bind-off.

After all the strips were joined this way, it was time for a blanket border. I picked up stitches along one edge, knit 3 garter ridges and bound off looking at the right side. Next, I picked up stitches along the opposite edge and worked the same border. On the 3rd side, I picked up stitches along the entire edge, including picking up stitches along the edge of the already-knit borders. Same for the final edge as for the 3rd one.

It was pretty unwieldy at the end. Not only because of the length of the rows, but because of the weight of the blanket. I worked resting my knitting on the dining room table. This amount of Lamb’s Prides weighs nearly…nearly…16 pounds! Oh lordy, I’ve knit myself one of those very trendy weighted blankets.

I’m sleeping under Gargantuan these days now that the weather’s cooled here. It’s a really good thing. Maybe when I have to wash it I’ll decide to unravel it back to its cat blanket origins. By then, friends and family will be needing replacements for their old ones. It will come full circle back to the cats.

The Vortex

This is the first time I’ve done modular knitting on doublepoints on quite this scale. Meet Vortex, by Lijuan Jing (and me). It’s knitted in JoJoLand Rhythm Superwash. Such a pretty little thing. And I do mean little. Quite an effort for 27 inches by 44 inches.

I’ve let it soak in Eucalan and dried it flat, as the JoJoLand Superwash Rhythm instructs, and it’s relaxed a bit since these photos were taken. The grooves are still nice and deep, but it’s just not such a concentrated weight of yarn anymore. Without this step, putting it on your lap felt a bit like when the dental hygienist lays that heavy gray x-ray apron on you. I’m adjusting to the odd size. More like a baby blanket, actually.

I don’t usually pass along a lot of knitting tips, but for anyone knitting Vortex here’s a few:

  • I needed 17 skeins, not the 16 the pattern called for.
  • Mark the first triangle so you’ll always know where “A1” is. Otherwise, you’re toast.
  • The instructions say to pick up stitches in a clockwise direction. I don’t get the “clockwise” thing, but what is meant is to pick up and knit the stitches in a backwards direction. Beats me how you do that. Instead of pick up and knit, I picked up and purled, putting the needle point in from the back side of the work while looking at the wrong side.
  • The directions for the order of the triangles are at the very end of the pattern. That’s a bit subtle and kind of easy to miss.  They are a bit idiosyncratic in that the written instructions tell you the order in which to knit the triangles, and it’s not always in numerical order.
  • But here’s the most important tip.  The  pattern (dated 11/30/2009) has errors. The instructions for the “T” isosceles triangles are wrong at rounds 4, 8, 11, 14, 18, 22, 26 and 30. Unfortunately after I tried a fix on my own (which sort of worked, but not as well as what the designer planned), I reached the designer at the email address on the pattern and received corrections. These are how the  instructions for the rounds listed above on the  four “T” triangles were supposed to read.  I was told it’s OK to tell my “friends” who may be knitting it. So, friends, this is the fix for the errors. I have to say that I haven’t tried it (because I am really sick of knitting little triangles) but it looks correct. And I clipped this stuff right out the designer’s email to be sure I wouldn’t be the one to introduce any new errors.

Rnd 4: k26, s1kp, k26, s1kp, s1kp, k46. (101 sts)

Rnd 8: p22, p2tog, p22, p2tog, p2tog, p39. (86 sts)

Rnd 11: k19, s1kp, k19, s1kp, s1kp, k34. (75 sts)

Rnd 14: p16, p2tog, p16, p2tog, p2tog, p29. (64 sts)

Rnd 18: k12, s1kp, k12, s1kp, s1kp, k22. (49 sts)

Rnd 22: p8, p2tog, p8, p2tog, p2tog, p15. (34 sts)

Rnd 26:k4, s1kp, k4, s1kp, s1kp, k8. (19 sts)

Rnd 30: p2tog, p2tog, p2tog, p1. (4 sts)

The error in the pattern is disconcerting, but the designer was very responsive to my inquiry. So that is a plus in my book.

This next photo is Vortex, edged with applied I-cord and after its Eucalan bath.  I dried it flat, but without blocking,  It relaxed some but I don’t think it was with much sacrifice to its signature deep grooves.